The humble bathroom vanity has undergone a dramatic transformation. No longer confined to traditional pedestal designs, the floating vanity has emerged as a stylish and space-saving solution for modern bathrooms. This sleek design, characterized by its seemingly weightless appearance, offers a blend of aesthetic appeal and practical functionality. From the diverse range of materials available – each with its own unique properties of durability, water resistance, and aesthetic appeal – to the intricacies of installation and maintenance, understanding the nuances of floating vanities is key to creating a bathroom that is both beautiful and functional.
This guide delves into the science and art of floating bathroom vanities, exploring the design considerations, space optimization strategies, maintenance techniques, and plumbing requirements. We’ll examine the various materials, styles, and installation methods, providing a comprehensive overview for homeowners and professionals alike. We’ll also address common concerns and provide practical solutions, empowering you to make informed decisions when choosing and installing your perfect floating vanity.
Design Considerations for Floating Bathroom Vanities

Floating bathroom vanities offer a sleek, modern aesthetic and can maximize space in smaller bathrooms. However, careful consideration of design elements is crucial for both functionality and longevity. The choice of materials, installation method, and overall style significantly impacts the vanity’s performance and visual appeal.
Materials Used in Floating Bathroom Vanities
The selection of materials directly influences the vanity’s durability, water resistance, and aesthetic qualities. Common materials include wood, acrylic, and various composite materials. Each possesses unique advantages and disadvantages.
| Material | Durability | Water Resistance | Aesthetic Appeal |
|---|---|---|---|
| Wood (e.g., oak, maple, cherry) | High, but susceptible to warping with prolonged moisture exposure | Moderate; requires sealing and regular maintenance | Classic, warm, versatile; can be stained or painted |
| Acrylic | High; resistant to scratches and impacts | Excellent; non-porous surface repels water | Modern, sleek, high-gloss finish; available in various colors |
| Composite Materials (e.g., MDF, particleboard with laminate) | Moderate; susceptible to moisture damage if not properly sealed | Moderate to High depending on the quality of the laminate; requires sealing | Versatile; can mimic the look of wood or stone at a lower cost |
Installation Methods for Floating Vanities
Proper installation is paramount for ensuring the vanity’s stability and preventing damage. The process typically involves securing a sturdy mounting bracket to the wall studs, followed by attaching the vanity to the bracket.
A step-by-step guide for typical installation:
- Locate and mark wall studs using a stud finder. Accurate stud location is crucial for secure mounting.
- Attach mounting brackets to the wall studs using appropriate screws and a level to ensure even placement. The brackets should be strong enough to support the weight of the vanity and its contents.
- Carefully position the vanity onto the mounted brackets, ensuring it is level and securely attached. Some brackets may require additional securing mechanisms.
- Install the vanity’s hardware, such as the sink and faucet. Follow the manufacturer’s instructions carefully for proper installation.
- Caulk around the edges of the vanity where it meets the wall to prevent water damage. Silicone caulk is commonly used for this purpose.
Styles and Designs of Floating Bathroom Vanities
Floating vanities are available in a wide range of styles to complement various bathroom aesthetics.
Examples of different styles:
- Modern: Characterized by clean lines, minimalist design, and often featuring sleek, high-gloss finishes. A modern floating vanity might be made of acrylic or a similar material with integrated sinks and minimal hardware. Imagine a rectangular vanity with a built-in basin and a simple chrome faucet, sitting against a white tiled wall.
- Traditional: Incorporates classic elements like ornate details, wood finishes, and possibly a pedestal sink. A traditional floating vanity might feature a rich wood finish, perhaps with slightly curved edges and decorative hardware, possibly with a more ornate sink design. Imagine a vanity made of dark cherry wood with detailed carvings, accompanied by a classic porcelain sink.
- Minimalist: Emphasizes simplicity and functionality, often featuring a simple, uncluttered design. A minimalist floating vanity might be made of a single material with a seamless look, with hidden storage and minimal hardware. Imagine a floating vanity made of a single slab of white marble with an integrated sink and no visible handles or knobs.
Space Optimization with Floating Vanities
Floating bathroom vanities offer a compelling solution for maximizing space, particularly in smaller bathrooms where every inch counts. Their design, which suspends the vanity from the wall, eliminates the need for bulky legs or a pedestal base, creating an illusion of more floor space and enhancing the overall sense of openness. This strategic use of vertical space is a key element in creating a feeling of spaciousness, even in compact bathrooms.
The strategic placement of a floating vanity can significantly impact a bathroom’s perceived size. For instance, a floating vanity installed along a shorter wall in a narrow bathroom visually balances the proportions, preventing the room from feeling cramped. In a small square bathroom, positioning a floating vanity against one wall allows for unimpeded movement and a more open floor plan.
The absence of a large, solid base beneath the sink creates a visually lighter feel, further contributing to the perception of increased space.
Floating Vanity Storage Capacity Compared to Pedestal Sinks
The storage capacity of bathroom vanities varies considerably depending on design and dimensions. However, a direct comparison between floating vanities and traditional pedestal sinks reveals a clear advantage for floating vanities in terms of storage solutions. Pedestal sinks generally offer minimal or no storage, limiting functionality. Floating vanities, on the other hand, often include drawers and cabinets, providing ample space for toiletries, towels, and other bathroom essentials.
The following table illustrates this difference:
| Feature | Floating Vanity | Pedestal Sink | Notes |
|---|---|---|---|
| Storage Capacity | High; typically includes drawers and cabinets | Low or none | Capacity varies greatly depending on vanity size and design. |
| Accessibility | Easy access to drawers and cabinets | Limited or no storage space | Drawers offer organized storage, unlike open shelving. |
| Visual Impact | Creates a sense of spaciousness | Can appear bulky and visually heavy | The absence of a base contributes to the airy feel. |
| Cleaning | Easier cleaning under the vanity | Difficult to clean under the pedestal | Improved accessibility enhances cleaning efficiency. |
Visual Appeal and Spaciousness Enhancement in Small Bathrooms
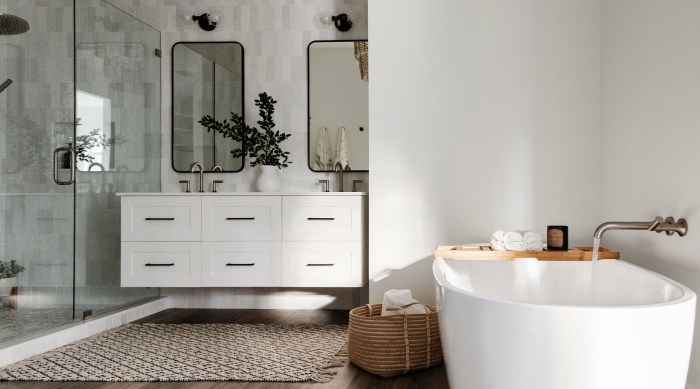
A well-designed small bathroom incorporating a floating vanity can appear significantly larger than its actual dimensions. Consider a 5ft x 6ft bathroom with a small shower enclosure. A wall-mounted floating vanity with a sleek, minimalist design in a light color (such as white or light gray) would visually expand the space. A large mirror above the vanity would further amplify this effect by reflecting light and creating a sense of depth.
The use of light-colored wall tiles and flooring, along with minimal décor, would enhance the airy atmosphere. The open space beneath the vanity allows light to circulate freely, avoiding the shadowing often created by traditional pedestal sinks, contributing to the feeling of spaciousness. This design approach emphasizes vertical space, which is a crucial element in maximizing the visual impact of a small bathroom.
Maintenance and Care of Floating Bathroom Vanities

Floating bathroom vanities, while offering a sleek and modern aesthetic, require diligent care to maintain their beauty and longevity. The porous nature of many vanity materials, combined with the consistently humid bathroom environment, necessitates a proactive approach to cleaning and preventative maintenance. Neglecting these aspects can lead to premature deterioration, water damage, and the unsightly growth of mold and mildew.
This section provides a comprehensive guide to ensuring your floating vanity remains a stylish and functional centerpiece of your bathroom for years to come.
Cleaning and Maintaining Different Vanity Materials
The cleaning methods and appropriate products for your floating vanity depend entirely on the material it’s constructed from. Improper cleaning techniques can cause irreversible damage, so understanding your vanity’s composition is crucial.
- Solid Wood Vanities: Solid wood vanities, often sealed with polyurethane or lacquer, require gentle cleaning. Avoid abrasive cleaners and scouring pads, which can scratch the surface. Use a soft, damp cloth with a mild soap solution (like a pH-neutral dish soap) to wipe down the surface. For stubborn stains, consider using a wood cleaner specifically formulated for sealed surfaces.
Regularly applying a wood conditioner can help maintain the wood’s moisture balance and prevent cracking.
- Laminate Vanities: Laminate vanities are highly durable and water-resistant. They can withstand more aggressive cleaning methods than solid wood. A damp cloth with a mild cleaner is generally sufficient. For tougher grime, a non-abrasive cleaner can be used, followed by thorough rinsing and drying. Avoid using harsh chemicals, bleach, or abrasive cleaners, as these can damage the laminate’s finish.
- Acrylic Vanities: Acrylic vanities are known for their seamless, non-porous surfaces. They are easy to clean and highly resistant to stains and moisture. A simple wipe-down with a damp cloth and mild soap is usually all that’s needed. For more stubborn stains, a glass cleaner can be used, but always test it on an inconspicuous area first.
Preventing Water Damage and Mold Growth
Preventing water damage and mold growth is paramount for maintaining the integrity and aesthetic appeal of your floating vanity. The bathroom’s humid environment creates an ideal breeding ground for mold and mildew, especially in areas with poor ventilation.
- Proper Ventilation: Ensure your bathroom has adequate ventilation. A properly functioning exhaust fan should be used during and after showering to remove excess moisture. Consider opening a window if possible to increase air circulation.
- Regular Cleaning: Regular cleaning prevents the buildup of dirt, grime, and soap scum, which can trap moisture and create a breeding ground for mold and mildew. Wipe down the vanity after each use to remove any spills or splashes.
- Sealing: For solid wood vanities, ensure all seams and joints are properly sealed to prevent water penetration. Regularly inspect the sealant and reapply as needed.
- Avoid Standing Water: Never allow water to stand on the vanity surface for extended periods. Immediately wipe up any spills or splashes.
Troubleshooting Common Problems
Despite diligent care, some issues may arise with floating vanities. Understanding these problems and their solutions can prevent costly repairs.
| Problem | Solution |
|---|---|
| Loose screws or wobbly vanity | Tighten loose screws or use stronger screws. If the problem persists, consult a professional for support reinforcement. |
| Water damage or swelling | Identify and address the source of the leak. Dry the affected area thoroughly and allow it to air dry completely. For extensive damage, professional repair or replacement may be necessary. |
| Mold or mildew growth | Clean the affected area with a solution of bleach and water (always test in an inconspicuous area first). Improve bathroom ventilation to prevent recurrence. For extensive mold growth, professional remediation may be required. |
| Cracked or chipped laminate/acrylic | Minor chips can sometimes be repaired with a specialized repair kit. For significant damage, replacement of the vanity top or the entire vanity may be necessary. |
Plumbing and Installation Considerations

Installing a floating bathroom vanity presents unique plumbing challenges compared to traditional floor-mounted units. The concealed nature of the plumbing necessitates careful planning and execution to ensure both functionality and aesthetics. Understanding the specific requirements for faucets, drains, and the overall installation process is crucial for a successful project.The successful installation of a floating vanity hinges on meticulous planning and execution of the plumbing connections.
This process involves careful consideration of the vanity’s design, the available space, and the type of plumbing fixtures being used. Improper installation can lead to leaks, instability, and even structural damage.
Plumbing Requirements for Floating Vanities
Floating vanities require specialized plumbing configurations to accommodate their wall-mounted design. The most critical aspects are the supply lines for the faucet and the drain system. Supply lines, typically flexible braided hoses, connect the faucet to the shut-off valves behind the wall. These valves allow for easy water shutoff in case of repairs or maintenance. The drain system, usually consisting of a P-trap and waste pipe, must be carefully routed and secured to prevent leaks and maintain proper drainage.
Faucet selection is crucial; widespread faucets offer a sleek, modern look ideal for floating vanities, while centerset faucets provide a more compact solution for smaller spaces. The drain should be designed to seamlessly integrate with the vanity’s design, often hidden behind the unit for a clean aesthetic.
Connecting Plumbing to a Floating Vanity
Safe and effective plumbing connection is paramount. The process requires precision and attention to detail. Incorrect connections can lead to leaks, water damage, and potential health hazards. Before beginning, always turn off the water supply to the bathroom.
- Step 1: Rough-in Plumbing: Before installing the vanity, ensure the water supply lines and drain are properly installed and positioned within the wall cavity. This includes securing the shut-off valves and installing the P-trap at the correct height and angle. Accurate positioning is vital for easy connection to the vanity later.
- Step 2: Mounting the Vanity: Securely attach the vanity to the wall using appropriate wall anchors and screws. The stability of the vanity is paramount, especially when considering the weight of the sink and potential water load.
- Step 3: Connecting the Faucet: Carefully connect the faucet’s supply lines to the shut-off valves, ensuring tight connections to prevent leaks. Use Teflon tape on the threads to further ensure a watertight seal. Hand-tighten connections initially, then use a wrench to ensure a secure fit.
- Step 4: Connecting the Drain: Attach the drain assembly to the sink’s drain opening and connect it to the P-trap. Ensure a proper seal to prevent leaks and maintain drainage efficiency. Use a basin wrench to access and tighten the connections under the sink.
- Step 5: Testing for Leaks: After completing all connections, turn the water supply back on and carefully inspect all connections for leaks. Address any leaks immediately by tightening connections or replacing faulty parts.
Installation Complexity Comparison
The installation of a floating vanity differs significantly from a traditional vanity. This table summarizes the key differences:
| Feature | Floating Vanity | Traditional Vanity |
|---|---|---|
| Installation Time | Longer (due to plumbing and wall mounting)
|
Shorter (simpler assembly and connection)
|
| Tools Required | Drill, level, stud finder, plumbing tools, wall anchors, measuring tape, silicone sealant | Screwdriver, level, wrench, possibly a drill for assembly |
| Skill Level Needed | Intermediate to Advanced (plumbing knowledge required) | Beginner to Intermediate (basic assembly skills sufficient) |
Accessorizing and Styling Floating Vanities
Floating vanities, with their sleek lines and space-saving design, offer a unique canvas for bathroom artistry. Their inherent modern aesthetic can be subtly enhanced or dramatically transformed depending on the chosen accessories and overall design approach. Careful consideration of materials, colors, and lighting creates a bathroom that is both visually appealing and highly functional.
Mirror Selection and Placement for Floating Vanities
The mirror above a floating vanity is not merely functional; it’s a crucial design element. A large, frameless mirror can visually expand a small bathroom, creating an illusion of spaciousness. Conversely, a smaller, ornate mirror can add a touch of vintage charm to a more traditional setting. The placement is key; positioning the mirror directly above the vanity maximizes functionality while maintaining a balanced aesthetic.
Consider the size and shape of the vanity itself when selecting a mirror – a proportionally sized mirror creates harmony, while a deliberately oversized or undersized mirror can introduce intentional asymmetry for a more dramatic effect. For instance, a rectangular vanity might pair well with a rectangular or even a square mirror, while a curved vanity could benefit from a round or oval mirror.
Lighting Design to Complement Floating Vanities
Lighting plays a crucial role in shaping the atmosphere and functionality of a bathroom. For floating vanities, layered lighting is ideal. Recessed lighting in the ceiling provides ambient illumination, while vanity lighting – such as sconces flanking the mirror or integrated LED strips beneath the vanity – offers task lighting for grooming. The color temperature of the lighting should be considered; warmer tones (2700-3000K) create a relaxing ambiance, while cooler tones (5000-6500K) provide brighter, more energetic lighting, ideal for makeup application.
A well-lit vanity not only improves functionality but also accentuates the design features of the vanity and its surroundings. For example, a modern bathroom with a minimalist floating vanity might benefit from sleek, linear LED strips, while a traditional bathroom might use elegant, antique-style sconces.
Decorative Elements and Styling Approaches for Different Bathroom Styles
The style of the bathroom dictates the appropriate decorative elements. A farmhouse bathroom, for example, might incorporate a floating vanity made of reclaimed wood, paired with a vintage-style mirror and rustic metal sconces. A neutral color palette of whites, creams, and soft grays would complement this style. In contrast, a modern bathroom might feature a sleek, minimalist floating vanity made of lacquered wood or concrete, with a frameless mirror and minimalist LED lighting.
A monochromatic color scheme, such as various shades of gray or black and white, would emphasize the clean lines of this design. A transitional bathroom might blend elements of both styles, using a floating vanity with a slightly more traditional design, paired with contemporary lighting and accessories. Materials like marble or quartz countertops would enhance the luxurious feel of a transitional bathroom.
These examples demonstrate how the choice of materials, color palettes, and accessories directly influence the overall aesthetic and functionality of the space.
Creating a Visually Appealing and Functional Layout: A Design Concept
Consider a modern bathroom with a wall-mounted floating vanity made of dark walnut wood. The vanity is 60 inches long and features two drawers with integrated soft-close mechanisms. A large, frameless rectangular mirror hangs above, extending the full length of the vanity. Two sleek, brushed nickel sconces are mounted on either side of the mirror, providing ample task lighting.
Recessed LED downlights in the ceiling provide soft ambient lighting. Underneath the vanity, a narrow shelf is incorporated for storage of towels or baskets. The wall above the vanity is painted a soft gray, creating a neutral backdrop that complements the dark wood. The countertop is made of polished white marble, adding a touch of luxury and contrast to the dark wood.
This layout emphasizes both functionality and aesthetics, creating a sophisticated and calming bathroom space. The clean lines of the floating vanity are accentuated by the minimalist design elements, while the contrasting colors and materials add visual interest. The ample storage space ensures practicality, and the layered lighting provides both task and ambient illumination.
Ending Remarks

In conclusion, the floating bathroom vanity represents a significant advancement in bathroom design, seamlessly blending form and function. By carefully considering the material selection, installation process, and ongoing maintenance, homeowners can enjoy the numerous benefits these vanities offer, from maximizing space in smaller bathrooms to enhancing the overall aesthetic appeal of the room. Understanding the unique characteristics of each material and the intricacies of installation ensures a long-lasting and visually stunning addition to any bathroom, transforming a functional space into a sanctuary of style and practicality.
The key lies in informed decision-making, balancing aesthetic preferences with practical considerations to create a bathroom that reflects your personal style and needs.
Questions Often Asked
What is the average lifespan of a floating bathroom vanity?
The lifespan depends heavily on the material and quality of construction. High-quality vanities made from durable materials like solid wood or high-grade acrylic can last for 20 years or more with proper care. However, less durable materials may show wear and tear sooner.
Can I install a floating vanity myself?
While possible for those with DIY experience and appropriate tools, installing a floating vanity requires precision and careful attention to plumbing and wall support. If you’re unsure, it’s best to consult a professional plumber or installer.
How do I prevent water damage to my floating vanity?
Regularly inspect for leaks around faucets and drains. Use sealant around joints and ensure proper ventilation to prevent moisture buildup. Promptly address any spills or leaks.
Are floating vanities suitable for all bathroom styles?
Yes, floating vanities are incredibly versatile and can complement a wide range of bathroom styles, from modern minimalist to traditional and even rustic designs. The choice of material, color, and accessories can be tailored to suit any aesthetic.
How much weight can a floating vanity typically support?
The weight capacity varies depending on the vanity’s construction and wall mounting. Always check the manufacturer’s specifications for weight limits before placing heavy items on the vanity top.
